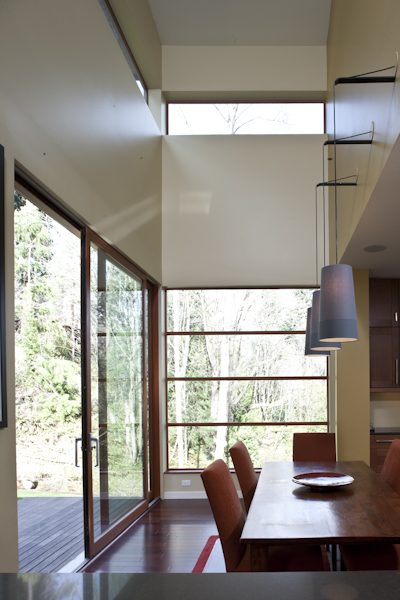
So what does it take to produce an image like this? Technologically speaking it requires the balancing of the interior and the exterior light sources. Artistically it’s about understanding composition and the intent of the architect. We will stick with the prior since this post is about the technical aspects of architectural photography. It use to be that I would have to flood the interior with large amounts of flash to bring the interior luminance closer to that of the brighter exterior. This process worked in the past, all though it was extremely difficult and time consuming. The issue was lighting the interior to look natural without casting awkward shadows from the strobes. The technique I use today of composite blending allows for greater control of the lighting and ultimately a better-finished image. That is not to say that I have stopped using strobes. Below in Image #1 I used strobes to get the image closer to the final lighting that I envisioned for the photograph. It’s been said for years that getting the image in camera is always the best. Well I look at it as getting it in camera for the information that I need from each image. Another words exposing one frame for the interior, one frame for the shadows, one frame for the lighting and so on.

Above is the straight shot with strobes that I will use as the base for the composite image. You can see from the settings in Lightroom that I have tried to bring down the highlights outside and have increased the information in the shadows. I’m trying to optimize this shot before exporting it to Photoshop. It’s important to note that I will take one frame with a grey card. I then use the eyedropper tool in Lightroom to color balance the interior. The auto white balance on the camera is good but it’s not that accurate. I’m shooting tethered into Lightroom, which allows me to color balance the image and make any adjustments necessary while I’m still on location. Remember these are tools and still require adjustment to get it right. Once I have the correct color balance I will then “sync” the entire image collection to have the same color temperature. One trick I use is to color balance the exterior separately. The exterior light temperature is different than that of the interior, by balancing it with its own color temperature I get a much more believable image.

Here are all 7 exposures and the final image. I have identified with red circles the information I will be using from each image in the composite. Except for Image #1 I have not adjusted the other images except for syncing the color temperature. You will notice Image #7 has a large black sheet blocking the light from the exterior. Glare and reflection must be controlled. In this case I chose to block the glare so that I could add it back later. As you can see the images are all taken on a locked down tripod. The images are brackets, which means exposing the image brighter and darker, in this case by 2 stops per image. By doing this I’m capturing light with the a dynamic ranger closer to the human eye than the camera can obtain in a single image capture. In the next post I will talk more about the Photoshop work flow to blend these images.