Friday, September 30, 2011

Portrait of Ray Calabro


I had the good fortune this week to take Ray Calabro portrait.  Ray became a principal at the highly respected architectural firm Bohlin Cywinski Jackson last year.  I had the opportunity to work with him on the 2010 AIA Seattle Honor Awards. http://www.bcj.com/

Wind Turbine Farms


After a site visit to a project in Cle Elum I decided to capture some images for a new project I'm working on.  Working title "Man In Nature".  I'm fascinated by the new wind turbine farms in Eastern Washington.  Here are some out takes that I took later in the evening.  The bright red lights are the tops of the turbines blinking, notice the ridge line to the lower left of red lights on the Vantage wind farm.  I lit up the center turbine with my Maglite.  What's crazy is that my two year old daughter will never know Eastern Washington without the wind farms.

Friday, September 23, 2011

Future Shack 2011

This was a busy week for the Seattle design community.  The first ever Seattle Design Festival took place and as part of that Future Shack took center stage on Tuesday night.  I have been involved in Future Shack before we had a name for it.  it has been a labor of love and Tuesday night was a great event.

This years jury consisted of Michael Fifield Professor of Architecture at the University of OregonMary Johnston Principal, Johnston ArchitectsMartin C. Pedersen Executive Editor Metropolis, and Jason Twill Senior Project Manager Sustainability, Vulcan.  They did a wonderful job understanding the projects and selecting the one's that they felt best fit the Future Shack goals.


The Future Shack program as we know it will now become a bi-annual event.  Alternating with the ever popular What Makes it Green competition.  With that said keep your eyes peeled for something different next year from the Future Shack committee.  I can't tell you what it might be but I guarantee you it will be cool.


http://www.aiaseattle.org/futureshack_2011

Seattle Magazine October 2011

This months Seattle Magazine has a great article on efficient homes.  Robert Humble of Hybrid Architecture is featured for his new home that has great water saving features.  And Daniel Whitmore froBlack Bird Builders has his passive house featured as well.  Both Robert and Dan and their wives were great to photograph, their houses represent something to aspire too.


http://www.seattlemag.com/category/section/lifestyle/northwest-home

Monday, August 22, 2011

Snap Shot #2 Bracketing the exposures


So what does it take to produce an image like this?  Technologically speaking it requires the balancing of the interior and the exterior light sources.  Artistically it’s about understanding composition and the intent of the architect.  We will stick with the prior since this post is about the technical aspects of architectural photography.  It use to be that I would have to flood the interior with large amounts of flash to bring the interior luminance closer to that of the brighter exterior.  This process worked in the past, all though it was extremely difficult and time consuming.  The issue was lighting the interior to look natural without casting awkward shadows from the strobes.  The technique I use today of composite blending allows for greater control of the lighting and ultimately a better-finished image.  That is not to say that I have stopped using strobes.  Below in Image #1 I used strobes to get the image closer to the final lighting that I envisioned for the photograph.  It’s been said for years that getting the image in camera is always the best.  Well I look at it as getting it in camera for the information that I need from each image.  Another words exposing one frame for the interior, one frame for the shadows, one frame for the lighting and so on.


Above is the straight shot with strobes that I will use as the base for the composite image.  You can see from the settings in Lightroom that I have tried to bring down the highlights outside and have increased the information in the shadows.  I’m trying to optimize this shot before exporting it to Photoshop.  It’s important to note that I will take one frame with a grey card.  I then use the eyedropper tool in Lightroom to color balance the interior.  The auto white balance on the camera is good but it’s not that accurate.  I’m shooting tethered into Lightroom, which allows me to color balance the image and make any adjustments necessary while I’m still on location.  Remember these are tools and still require adjustment to get it right.  Once I have the correct color balance I will then “sync” the entire image collection to have the same color temperature.  One trick I use is to color balance the exterior separately.  The exterior light temperature is different than that of the interior, by balancing it with its own color temperature I get a much more believable image.


 Here are all 7 exposures and the final image.  I have identified with red circles the information I will be using from each image in the composite.  Except for Image #1 I have not adjusted the other images except for syncing the color temperature.  You will notice Image #7 has a large black sheet blocking the light from the exterior.  Glare and reflection must be controlled.  In this case I chose to block the glare so that I could add it back later.  As you can see the images are all taken on a locked down tripod.  The images are brackets, which means exposing the image brighter and darker, in this case by 2 stops per image.  By doing this I’m capturing light with the a dynamic ranger closer to the human eye than the camera can obtain in a single image capture.  In the next post I will talk more about the Photoshop work flow to blend these images.

Friday, August 5, 2011

Snap Shot #1


The time and space of architectural photography as it exists today.

The snap shot has evolved quickly in the digital age.  I find it exciting and sometimes overwhelming.  This quickly changing technology affects my world as a photographer quicker than many other fields.  The digital imaging revolution, that is well under way, offers a major change every few months in the equipment and software.  I need to keep up with advancements without losing focus on the goal of producing great imagery for my clients and myself.  No matter what the advancement, it still boils down to the fact that these are all tools.  A pencil is a tool and the in the right hands it can yield amazing artwork, the same can be said for a digital camera.  I thought it would be interesting to take a snap shot of my workflow today.  It is ever changing and evolving and is nothing like what I was doing two years ago.  My hope is that this peek behind the curtain will be helpful to photographers and clients alike.


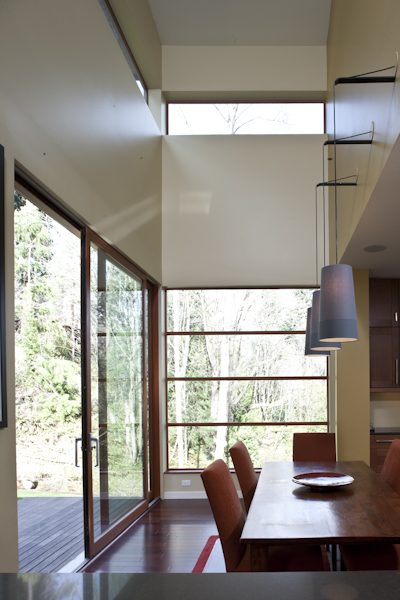
The completed image above was taken for Northwest Home magazine recently.  This image is a composite of 7 images.  This is a fairly standard image in terms of the number of exposures and the Photoshop processing required.  First it’s important to remember that the human eye can record 22 stops of light and high-end digital cameras can only capture only 12-13 stops.  With each stop being a doubling or halving of light the camera is a long way off from what the human eye can record.  Architectural photography deals with incredibly high contrast ranges, particularly images such as this one.  The interior light was 5 stops darker than that of the exterior. 


Above is the finished image along side the “straight shot”.  You will notice the exterior is "blown out" which means there is little to no information because it is to bright or blown out.  In the next post I will show the Lightroom settings and start combining the images together into the final product.

Monday, July 25, 2011

Tom Douglas's Summer Camp

I was lucky to have had the opportunity to participate in Tom Douglas's Summer Camp.  I love to cook and when the opportunity opened up that I would get to participate in the week long food intense workshop I was more than thrilled.  Because of my schedule I was only able to attend the first day.  In that day we learned to make pasta, mozzarella cheese, Tibetan sticky buns, beer cocktails, pan gravy, biscuits, de-bone a chicken, and last but not least fried chicken.  Of course we were eating and drinking as we went along.  I joked with a few of the campers that had participated before that I would gain 10 pounds this week.  They responded that they have in the past and that this year they incorporated a workout schedule into the mix for themselves.  This is a truly great time.  Here are some images I took from that day.


Additional images:
Summer Camp Images

Information about Tom Douglas Summer Camp:
Summer Camp